


Leather Repair Process Explained for Sofas
- ashbourneleathercare

- 6 days ago
- 6 min read
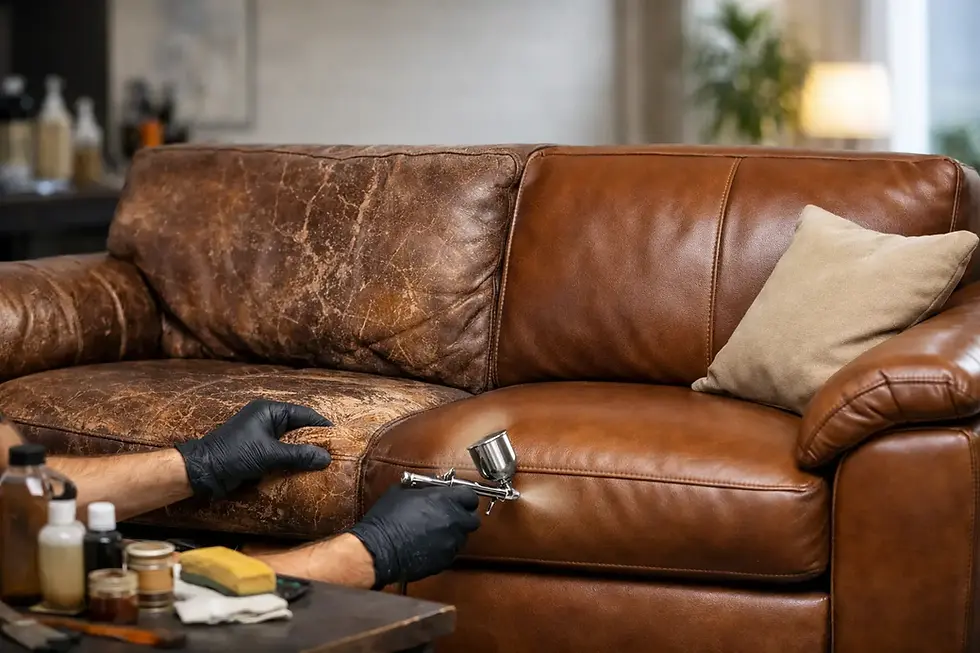
Leather Repair Process Explained for Sofas. A pale patch on the arm of a leather sofa, a ballpoint pen mark on the cushion or a line of cat scratches can make the whole room feel tired. The good news is that damage does not automatically mean replacement. The leather repair process explained below shows how a professional assessment, careful preparation and accurate finishing can bring worn furniture much closer to its original appearance.
For homeowners, the key is understanding that leather repair is not one quick treatment. A successful result depends on identifying the leather type, the cause of the damage and the condition of the surrounding finish. A scuff, for example, needs a different approach from bleach damage or a deep tear.
Leather repair process explained step by step
1. Assessing the leather and the damage
Every repair begins with an inspection. A specialist looks at the affected area, but also at the wider sofa. Is the colour fading across the seating area? Has body oil darkened the headrests and armrests? Is the surface coating worn away, or has the leather itself been cut or torn?
This matters because leather furniture comes in different finishes. Many modern sofas have a protective coloured coating on the surface, while aniline and semi-aniline leathers have a more natural appearance and can absorb products differently. Using the wrong cleaner, colourant or filler can make damage more noticeable rather than less so.
Photos are often enough to provide an initial quotation, especially where the issue is a stain, scrape, colour loss or worn seating area. Clear photographs in natural light, including one wider image of the sofa and a close-up of the damage, help establish the likely work required. An on-site inspection then confirms the best repair method.
2. Cleaning away soil and old residues
Leather Repair Process Explained for Sofas. Leather must be properly cleaned before any repair starts. Everyday grime, skin oils, furniture polish and previous DIY products can prevent new colour or repair materials from adhering correctly. This is particularly common on sofa arms, headrests and favourite seats.
Professional cleaning is controlled rather than aggressive. The aim is to lift surface soiling without stripping colour or over-wetting the leather. Heavy scrubbing, household cleaners, baby wipes and strong solvents can damage the finish, leave a shiny patch or push a stain further into the material.
Some marks need separate treatment at this stage. Ink, glue, nail polish and dye transfer can be difficult because they may react with the existing coating. Bleach stains are different again: the leather is often clean, but the original colour has been removed. In that case, cleaning alone will not solve the problem - colour restoration is needed.
3. Preparing worn, scuffed or damaged areas
Once clean, the damaged section is prepared so that it blends with the surrounding leather. Loose finish, rough edges and flaky coating are carefully smoothed. Where a surface is worn through, the area may need to be stabilised before colour is reapplied.
For minor scuffs and scratches, preparation can be relatively light. The specialist refines the damaged edge and builds the finish back in thin layers. Deeper scratches, pet claw marks or splits may require flexible repair compounds to level the surface.
The aim is not to leave the leather feeling hard or plastic. Sofa leather flexes every time it is used, so repair materials must remain flexible too. This is one reason quick DIY fillers can disappoint: they may look acceptable initially but crack or lift when the seat is used.
4. Matching the original colour
Colour matching is where craftsmanship makes a clear difference. A sofa described as brown, grey or cream may contain several tones, with warmer or cooler notes that change in different light. It may also have faded unevenly over the years, particularly near windows or on the most-used seats.
A specialist mixes and tests colour to suit the furniture rather than simply applying a standard shade. The target is to make the repaired area sit naturally within the existing leather, not to create a flat patch that stands out from across the room.
Sometimes a small local repair is the right choice, such as a single scuff or bleach splash. In other cases, the best result comes from restoring an entire panel, cushion face or seating section. If the colour loss is widespread, treating only one spot can make the rest of the sofa look dull by comparison. The right option depends on the extent of wear, the leather finish and how evenly the furniture has aged.
5. Rebuilding colour in fine layers
After matching, colour is applied gradually. Thin, controlled layers allow the technician to build coverage while preserving the natural grain and texture of the leather. Rushing this stage can leave a thick, painted look, which is exactly what quality restoration is designed to avoid.
For faded sofas, colour restoration can revive seating areas, armrests and backs that have lost their depth. For accidental damage, it can disguise a lightened bleach mark, remove the contrast of a scrape or restore a section where the top colour has been worn away.
The finish is adjusted to suit the sofa. Leather can have a matt, satin or more polished appearance, and getting the sheen wrong can make a technically good colour match look obvious. Texture, colour and sheen all need to work together.
6. Sealing and curing the repaired surface
The final stage is to apply a protective finish. This helps the restored section resist everyday use and ensures the new colour is properly held in place. It is then allowed to cure as required before normal use resumes.
A good repair should feel comfortable, look natural and stand up to sensible day-to-day use. However, no restoration can turn heavily deteriorated leather into brand-new hide. If leather has become badly cracked, weakened by age or damaged across several large areas, the specialist will explain what can realistically be improved. Honest advice is part of a worthwhile repair.
What can be repaired on a leather sofa?
Many common problems can be improved without taking furniture away from your home. This includes scuffs, scratches, worn colour, faded seating, ink marks, glue, nail polish, and light stains. Ashbourne Leather Care provides this work on-site, allowing most sofas and leather furniture to be restored where they are used every day.
Results depend on the material and the damage. Surface colour loss and minor accidental marks often respond very well. Widespread cracking, severe dye penetration or damage to delicate unfinished leather may need more involved work and can carry limitations. A clear assessment avoids false promises and helps you decide whether repair is the sensible alternative to replacement.
Why DIY leather repairs can go wrong
DIY kits may appear cost-effective, but they are usually designed for generic colours and simple surface marks. They rarely account for the precise shade, grain pattern or sheen of an individual sofa. Applying too much product, choosing the wrong colour or using a stiff filler can leave a repair more visible than the original damage.
There is also a risk of making later professional work more difficult. Silicone-based polishes, coloured balms and unsuitable cleaning products can interfere with adhesion and may need to be removed before restoration begins. If you notice a fresh stain, avoid rubbing it hard or applying household chemicals. Blot loose material carefully and take clear photographs instead.
Keeping restored leather looking its best
Once repaired, regular gentle care helps protect the result. Dust the sofa with a soft cloth, deal with spills promptly and keep it away from strong sunlight or direct heat where possible. Sunlight can fade colour, while radiators and fires can dry leather over time.
Avoid sitting on the armrests, placing sharp objects on cushions or using sprays intended for other materials. Leather benefits from suitable cleaning and conditioning at appropriate intervals, but more product is not always better. The correct routine depends on the finish and how heavily the furniture is used.
If your sofa has a mark, scrape or faded area that catches your eye every time you walk into the room, do not assume replacement is the only answer. Send clear photos and your location for a straightforward quotation, and let a specialist advise on the most practical way to bring your leather back to life.


Comments